Skatepark: Bird’s Eye View – Jenna Martin Fine Art Photographer

This is one of those photos that happened all at once. I had made up my mind to shoot another photo this night, but as soon as I drove past the skatepark I completely changed gears (get it…nice). I decided I wanted to do something completely different. So I went home, changed, and headed back down to the local skatepark and hoped there were still people there.

IMG_0546

There were. There were plenty of people there. The 90 degree day had slowly cooled off to the low 80’s, meaning it was just about perfect weather for a little time-killing.

Believe it or not, this was actually one of my easier photos to take. After I did the floating part, I just sat back and relaxed while I took plenty of photos of everyone else doing their tricks. Of course no shoot is complete without just a little bit of goofing around…

And then here are a few “extra” photos 🙂

Not a bad night if you ask me :).

In the end, this was the final photo. It was awesome getting to hang out with everyone, and thanks to all the people that let me photograph them doing awesome tricks!

Skatew

http://www.jennamartinphotography.com

Like this post? Scroll down and sign up to receive posts by email :)!

Runaway Bride – Jenna Martin Fine Art Photographer

I’d actually been waiting for a cloudy day for this picture, but since the suitcases are on loan I decided last night was as good of circumstances as I was going to get, and in reality, I kind of like the way it turned out with the setting sun in the background.

I have to say, while some photographers plan their shoots to the millimeter, I tend to be more of a free spirit. I have a general idea of what I want the photo to look like in my head, but until I’m on location I never really set anything into motion. I guess you could say it all kind of comes to me in the moment. Sound cheesy? Probably, but I can’t quite think of a better way to explain it.

For this photo, I used suitcases as my prop. I set my camera up in the direction I wanted then began photographing myself until I got an image I was happy with. Fortunately (since I was quickly losing light) I hit a decent pose rather quickly, which meant the rest of the night was spent positioning my props the way I wanted them. Besides the obvious stares from cars passing by (no doubt wondering who the crazy lady dressed in white is and why she is standing on the side of the highway throwing suitcases into the air), the shoot went pretty quick. I snapped this photo right in the middle of the fiasco while taking a much needed break (it’s hard work throwing suitcases around!).

969350_499263100149671_1024839477_n

The editing, however, is not a fast process. It’s now 4:50 am and I’m just getting around to finishing up the blog post. Here’s a little peak of my morning as the editing goes along:


While I say I have about 8 or 9 layers going in the video, the final photo ended up as a composition of 32 layers, then a few extra for effect. It all came together for this final product:

Runaway Bridew

In the end, I’m actually pretty happy with it! Click here if you’d like to see the first of the “Dream” collection, and don’t forget to visit my website or Facebook page for more!

http://www.jennamartinphotography.com

Like this post? Scroll down to receive posts by email :).

Can I Get a Hottub?! – Jenna Martin Fine Art Photographer

On my first outing with my underwater camera housing, I had no idea where to go. I knew the water had to be semi-clear, but I had no idea just how clear. Could there be a little murkiness? Would I maybe actually like the murkiness? How much was too much to where it would distort the image? I had no idea. So the first place I went was to Lake Elmo, a spot right here in Billings. Granted, it’s known as a giant mud puddle to locals, but I needed to start somewhere. I recruited my boyfriend’s mom, Eddy, to come hold the camera while I attempt to model underwater.

Turns out, Lake Elmo was not the best place to start. The water was so murky I couldn’t see anything more than 6 inches in front of my camera. One hour of work down, no results. Next location.

Spot #2 was the river. I figured with moving water, the fine muck and mud would be washed downstream and the water would be fairly clear. I was even curious to see what the motion would look like. But alas, it was still too murky. I could see a vague blur of color where the subject was, but there still wasn’t anything I could possibly edit. I’m still in search of a deeper part of the river where the dust and mud can settle, but for now I needed another option.

I’d already taken pictures at the pool, but everything had that blue tint. I thought it was just the background of the pool itself, so I brought a variety of backgrounds. As it turns out, the blue tint is because of the chlorine. It can taken out in post, but it’s definitely quite the process. I needed an unchlorinated spot.

Eddy explained that we could try her hottub. It was tiny, but it was unchlorinated. Sure we were going on 3 hours of wasted time and I was unsure of whether or not I could even get a photo in a tiny space, but we had to try. So I put a wide angle lens on my camera, submerged myself in barely 1′ of water and clicked away. And these were a few of the results :).

IMG_2195

IMG_2158

IMG_3609

IMG_3455

Feel free to click here if you’d like to learn a little more about how I made my underwater camera housing :).

http://www.jennamartinphotography.com

Daydreamer At Heart – Jenna Martin Fine Art Photographer

In all reality, I shot this photo because I wanted an excuse to wear my new white dress :).

I got it for $12 at Goodwill and I’m pretty sure it was used as a wedding dress at some point. Thing is though, it’s HUGE on me, so unless I cinch it with a belt and wear a few inches of footwear, it’s barely manageable to walk in. All that extra fabric really helps when it comes to taking a floating photograph though.

The funny thing is, this photo is nothing like how I imagined it would be. I actually arrived at the idea that I wanted to be floating away on an umbrella, very Mary Poppins-ish. Through editing though, I decided the umbrella was really just getting in the way. I didn’t want to appear that I was using the umbrella as a crutch, I wanted to be floating on my own. So hence, the umbrella got cut.

This was also done in a field close to my house and since it was taken around 5:00 am, I didn’t have to worry about getting in trouble for trespassing…which, um…I totally wasn’t.

Daydreamer

Building Underwater Camera Housing – Jenna Martin Fine Art Photographer

When I first started really getting into photography, the thought of underwater photos intrigued me. How amazing it would be to capture images underwater,” I thought to myself. So I started researching exactly how one might go about putting their camera underwater, because lets be honest, this setup surely wasn’t going to do the trick (and yes, that’s one of my many beautiful cats lounging on my countertop).

431849_468758189866829_1174101156_n

But upon typing in my search inquiry, my heart sank. It looked as though there were two options: 1.) A camera bag and 2.) A housing facility. The camera bag, priced at the low end of the spectrum (roughly $100-$150), seemed to better fit my budget, but after reading the horrible reviews every bag received (“Hugely susceptible to human error”, “Leaked the first time I tried it in my bathtub”, “Leaks if placed lower than 1′ of water”, “Leaks because it’s Tuesday” ) I decided against it. I needed something substantial that put one of my most valuable possessions in as little of harm’s way as possible.

So next I took a look at housings.

For a 5D Mark II, underwater housing starts at roughly $1500 and goes up from there. $1500? I was nowhere near being able to afford $1500! I slammed my computer shut and thought to myself, “It’s okay. I just need to save up some money before I can start taking underwater photos. I can live with that.”

Except I couldn’t live with that. The thought burrowed into the back of my brain and wouldn’t leave. “Does this mean only people with $1500 lying around should be able to take underwater photos?” The more I was told I couldn’t take the pictures without proper equipment, the more I became obsessed with it. There just had to be a way…”

And that way, I decided, was to make my own housing. I figured I could devise a structure that would allow me to put my camera inside, and I could use an automatic shutter release to take the photos from the outside. As long as all my settings were adjusted before I put the camera underwater…it was possible. So I recruited the help of my boyfriend’s step-dad, Scott, and we started to build.

943312_469223163153665_1182354787_n

The first prototype was part of an insulated cooler. I needed to have a removable lid so I could take my camera in and out. I figured we’d cut the bottom out, replace it with Plexiglas and seal any spots where water could get in. Seemed simple enough, right?

960191_469389033137078_1973198841_n

Not even close. As soon as I reached a depth over 3′ deep the Plexiglas popped off the bottom like a dandelion head. Apparently I had completely underestimated the amount of water pressure I’d be dealing with here…

Some adjustments had to be made. Instead of sealing the Plexiglas on the inside of the container, we sealed it on the outside. By pushing the small disc against the contraption to which it was already attached, the water pressure was working with me instead of against me. There were still some issues with the lid leaking (as per the water-soaked dive weights inside), so I thought an extra dose of duct tape might do the trick for now. 

995810_484807198261928_354444037_n

How wrong could I be. The bottom seemed solid, but water was still rushing in from the top. Since I couldn’t find an O-ring large enough to fit inside, I tried everything else: thread tape, weather stripping, plenty of silicone and countless other options. Sealing from the inside certainly wasn’t going to do the trick.

So we opted for an outside option instead. We tried a variety of rubber options with a combination of pipe clamps. We even tried an old bike tire, but it turned out that it wasn’t even remotely waterproof (who would’ve thought?).

996791_485022258240422_501424245_n

Plus, water was slowly leaking in through the Plexiglas window. Somehow, it was coming in through the lid, seeping down through the insulation and coming back out through the bottom. I needed to start from scratch.

Instead of starting with something already built, I decided to design something myself. When I met with Scott that night, he showed me some of the designs he had drawn up and they ended up being almost identical to what I was thinking in my head. Since my camera measured a little more than 6″ across, I knew that would be my rough estimate of a sizing option.

6527_486718714737443_237214600_n

The available pipe options I had locally went from 6″ to 8.5″. We took a chunk of 8.5″ pipe, a chunk of coupling and sanded some Plexiglass to barely fit into the rim of the coupling. We sealed it, placed the pipe on top, sealed it with AVS glue and used a rubber pipe cap and pipe clamp as the lid. This had to work. It was just too pretty not to!

Off to the pool I went (thanks to the Comfort Inn for constantly letting me use their pool over the last few months!) hoping this would be the one.
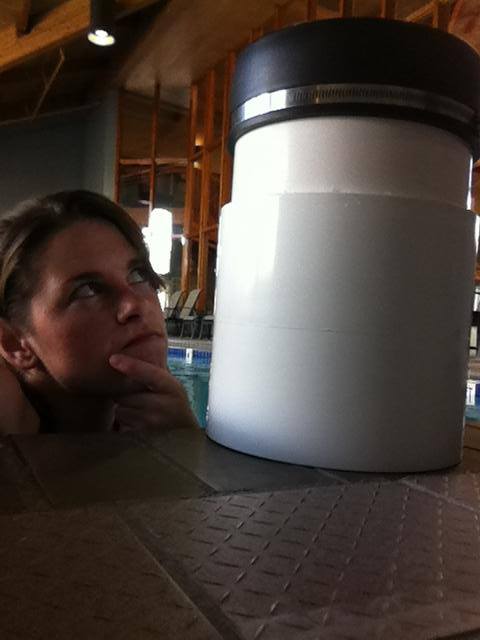
945604_487018718040776_476058029_n

And the result?

580157_487061468036501_638007628_n

It worked! It worked, it worked, IT WORKED! Thanks Scott for all your help, and be sure to click here if you want to see my first round of underwater photos :)!

Now to make a list of all the things I can put underwater…

http://www.jennamartinphotography.com